Archive for November, 2008
Thanksgiving aftermath.
Everyone cleared their plates, nobody got food poisoning, and there are plenty of leftovers. I think that means Thanksgiving dinner was a success! Today we are recuperating.
13 commentsThanksgiving menu.

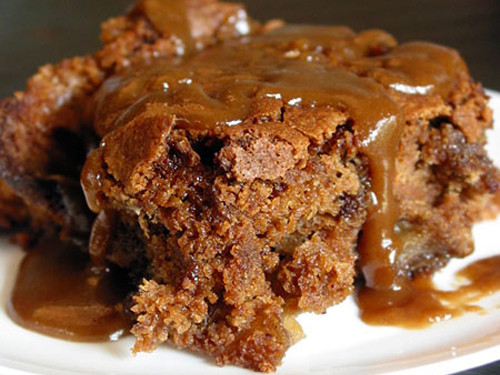
I’m preparing Thanksgiving dinner for the first time this year! It’s only for 8 people (my mother and stepfather, Evan’s parents and his sister/her husband), but I’ve been planning as though it’s a banquet for 100. I’m on vegetarian hiatus (I like to think of it as my rumspringa) after 15+ years of meat-free Thanksgivings, so turkey is still kind of foreign to me. I hope I don’t give anyone salmonella poisoning. (And yeah, I’m clear on the fact that “medium rare” is not an option for turkey!)
Most of my menu is based on recipes from Everyday Food, with tweaks and adjustments as I see fit. I’m a decent cook, but a lot of this (turkey, mashed potatoes, etc.) is new territory for me. I’m excited!
Beverages
hard cider/beer
wine (red & white)
lemonade spritzers
coffee/tea
hot apple cider
Snacks
spiced nuts
olives
various crackers & cheeses (with hard salami & fig spread)
parmesan cheese straws
Main Courses
bacon-wrapped turkey roulade
mushroom turnovers
Side Dishes
wild mushroom stuffing
pecan cornbread stuffing
glazed sweet potatoes
roasted garlic mashed potatoes
spring greens with shallots & gorgonzola
cranberry sauce
biscuits
Desserts
Bernie’s coconut cream pie
Debby’s cheesecake
double-apple cake (see photo above, YUM)
Butternut squash & broccoli rabe.

I can’t stop cooking butternut squash and broccoli rabe (aka rapini). I’m obsessed! The combination of flavors is just too perfect this time of year—sweet squash and bitter broccoli rabe compliment each other so well, and both are made even more delicious with copious amounts of garlic.
Butternut Squash (1 squash)
- preheat oven to 400 deg
- cut butternut squash in half, scoop out seeds/pulp
- baste cut sides with olive oil
- sprinkle with coarse salt and pepper
- place squash on foiled-lined baking sheet, cut sides up
- put three cloves of garlic (peeled, whole) in each scooped-out cavity
- bake for 60-70 minutes, depending on size of squash (you might want to baste the squash with olive oil partway through cooking)
- mash garlic cloves into the squash, add a little butter if desired…
Broccoli Rabe (1 bunch)
- wash well & trim thick ends
- boil for 5 minutes in salted water, drain
- saute in olive oil with garlic (2-3 cloves, minced) for 10 minutes
(Serves 2 people quite well!)
This is my favorite time of year for cooking. What have you been eating as the cold weather sets in?
18 commentsFritz is 10 months old.
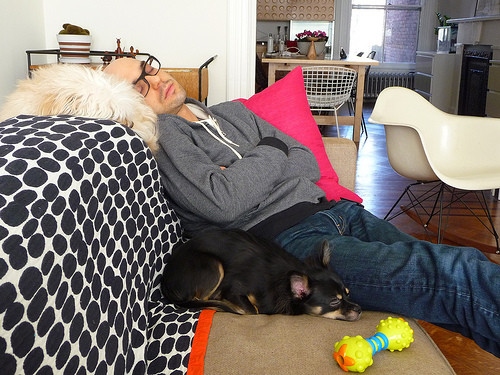
It’s true, Fritz sometimes sounds like Chewbacca crossed with an angry seagull, and yes, it’s also true that he thinks sofa cushions are just scrumptious, but I love him. So much. Yesterday he spent about 6 hours happily and snoozily curled up in a down-filled pillow that he had turned into a little nest. What a life! He really is a great dog.
p.s. He used to be so little! And he has always looked good with cerise.
28 commentsFloor plans.
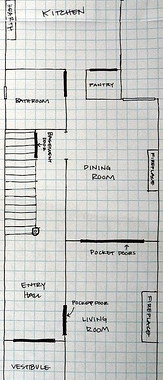
A few people have mentioned that they’d like to see floor plans of my house, so I drew some up (very) quickly. They’re definitely not perfectly to scale (I didn’t get up from the sofa once to measure anything!), but I don’t think they’re too far off.
If you’d like to see the plans with notations, I added some on Flickr (downstairs & upstairs).
9 commentsPocket doors.


The pups and I were shut in the living room all day while the plumbers finished the rough-in (they’re done, hooray!), and as I was walking back from the kitchen, I was reminded of how beautiful the pocket doors between the dining room and living room are. We very rarely close them unless we need to contain the dogs for some reason, but they really are great. They’re in better condition than any other doors in the house, probably because they’ve spent much their lives inside of the walls, protected from shoes and fingernails and chairs and dogs.
19 commentsTiny progressions.


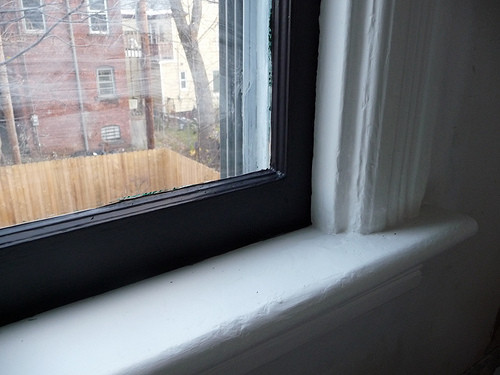
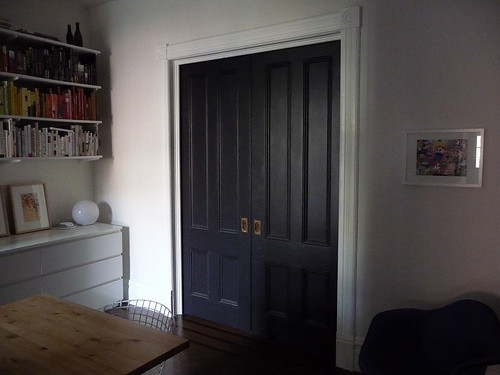
The windows in the unused back room have been repaired and repainted. I decided to paint the sashes black (BM Toucan Black) in this room, as the floors will eventually be painted white.
(I feel the need to note that what might look like a sloppy paint job on the sash is actually someone elses sloppy old paint job on the outside of the sash showing through the glass and giving my paint job a bad name. Someday we will have the woodwork on the outside of the house scraped and repainted by someone with scaffolding, but that day is not coming in the near future. Alas.)

Also, remember that $25 Danish sofa I rescued a year ago, with thoughts of refinishing the wood and having it reupholstered? Yeah, it’s still sitting there, doing nothing. Eventually it will be moved down to the basement, where it will sit and sit and sit while I try to wade my way through the list of projects I have lined up to carry me through retirement and into old age. Hey, you have to keep those aging brains active! I think of things like the sofa and the back room as being a sort of health insurance.
15 commentsBathroom details, continued.

Wow, that’s a lot of stuff!
We’re moving right along with the bathroom (the subfloor is complete, the roughing-in is almost done…next comes electric!), so we’ve had to hurry up and make decisions about things like bath hardware and a how we want to keep the room warm.
I’m super excited about our Runtal towel radiator! It’s powerful enough to heat the whole bathroom (there’s no heat source in there right now), with the added benefit of keeping our towels warm and dry. What a luxury! We were able to find a good deal on eBay, too.
We’ve also decided to go with wide-plank beadboard on the walls outside of the tub area (around the tub will still be subway tile, as originally planned). We’re going to run it 8′ high, leaving only a 2′ border at the top of the room. I think that border and the ceiling might get painted a dark, charcoal gray, to complement the black pennyround tile (with charcoal grout) on the floor.
22 commentsMoo & Oink Market.

What a weekend we had in Newburgh! On Saturday, we attended the grand opening celebration for our friends’ new local food market, Moo & Oink.


We are SO EXCITED to have a place to shop for food within walking distance from our house. That Moo & Oink’s focus is on local and organic foods just adds to the pleasure! It’s across the street from our favorite restaurant, Caffé Macchiato, on Liberty Street. We’re so used to seeing empty storefronts and dilapidated buildings that it’s a little shocking (in the best possible way!) to see this revitalization taking place. A cheesecake bakery and another restaurant are opening soon, too, and we recently got a lovely art supply store…all on the same street! Newburgh just keeps chugging along, getting better and better, little by little. When we made the decision to move to Newburgh three years ago, we had no idea what would happen—this is all very, very welcome. I feel like I have a community!


This is a Public Service Announcement.
If you wear clothes, listen up! (The 3% of my readership comprised of nudists can skip this post.)
When you buy a jacket, skirt or coat that has a vent/slit on the back or sides, sometimes it has a loose “X” stitch holding the vent together. FOR THE LOVE OF ALL THAT IS HOLY, YOU NEED TO CUT AND REMOVE THIS THREAD!!!!!!!! It’s not meant to be left in place! It’s a temporary stitch intended to keep the vent from opening/creasing while the jacket is hanging in the store.
Go to your closet(s), and examine every garment carefully to make sure you don’t have any temporary stitches holding those vents/slits together (NB: sometimes pleated skirts have these stitches, too, but I’m hoping nobody needs to be told to cut them—but you never know). If you see any, snip them immediately. I promise it’s the right thing to do. The coat/jacket/skirt will not hang right if you don’t. It will look awful, frankly. Really. Cut the threads.
While you’re at it, remove any tags on the outside of garments. If I see one more person with a “100% WOOL” tag on the sleeve of their coat, I am going to LOSE MY MIND.
Wow, it feels really good to get this off of my chest. You can ask Evan—I get totally irate every time I see a temporary stitch on someone’s coat. I mean, it really makes me crazy. I obsess over it. I point them out and stare at them and have to will myself to not take out a pair of cuticle scissors and snip the threads myself. I’ve even thought about having cards printed up explaining that the threads are supposed to be removed before wearing. I could discreetly slip them into the hands of offenders and then run away before they look at them.
Feel free to forward this post as you see necessary. Let’s work together to make this world a better place!
68 commentsWhere we’re at with the bathroom.

The tiles are gone. Two layers of sheetrock are gone. Two layers of rotted subflooring are gone. The shelving is gone. The walls are gone, the floors are gone, the toilet and sink are gone. Gone! What’s left is what you see here. (This is where we started.)


Yeah, I guess the original floor isn’t salvageable after all! I had been hoping to find something workable under all of that plywood, but asbestos-laden tar paper and rotted planks go beyond what I’m willing to repair (with good reason). And so, what you see here will be covered with a new plywood subfloor and the matte black pennyrounds I originally planned to use.
(If you’re desperate for demo photos, there are more here!)


I coated the floor with a heavy-duty primer to help prevent scary stuff from getting kicked up while we worked on the new subfloor. Then I dug out the rotted areas and filled them with epoxy.

We also started putting in the new subfloor! It took me an hour of obsessive measuring to do what you see above! I’m not a numbers person, so I have to draw diagrams and over-label everything. We ran the grain perpendicular to the joists, put screws in every 6 inches (avoided the joists, attached the subfloor only to the original one), shimmed the low spot with cedar shakes, and so forth. Neither Evan or I knew anything about any of this until we started doing it, so it’s very exciting to embark on projects with a sense of confidence.
On Friday, the plumbers are coming to do the roughing-in. I can’t believe this is all moving so quickly!
23 commentsWhite, gray, and a little bit of color.

Confession: There’s an unused bedroom at the back of my house. It currently looks only slightly better than it did a year ago, when it was housing the tub and sink during our endless bathroom renovation. I’ve been slowly doing things like repairing the windows and scraping peeling paint from the moldings, but it’s all very half-hearted. Eventually we’d like to move our bedroom back there, away from the street completely and into the only bedroom in the house with a single door.
I don’t know what my problem is. I suppose I could blame my slacking on the rest of the house… but… well, I don’t know. The ultimate plan is to paint the unfinished plank floor white (it was unearthed under two layers of glued-down carpeting, and it in pretty rough shape), which should reflect a lot of daylight. The rear of the house faces North, so it does tend to get a little dim back there.
I’m going to just hang out and look at these photos for a while and try to get myself moving. Sigh…

(from LivingEtc)

(photo by Hotze Eisma, via DTI)
Adam’s bedroom!
Back in June, I started a blog with my good friend Adam to document renovations I was urging him to make on his house. I’m so happy to see that he has finished (well, minus the furnishings) some pretty amazing work on his bedroom, and I have to make mention of it here.


Um, WOW!!! How gorgeous is that blue painted floor? Adam removed layers of carpeting and linoleum, took down the dropped ceiling, restored the door and hardware, repaired the original plaster walls, removed and closed off a badly leaking chimney, and did countless other things in his quest to make a space for himself that is peaceful, clean, and totally Adam. I know it’s been an emotional ride (as renovations often are, and I say that from experience!), but I believe that the results of this transformation will inspire Adam to carry his skills throughout his house to make every inch of it a place to be proud of. (Stay tuned to Adam’s blog to see everything come into place!)
As a reminder of just how far you can come in just over four months of weekends, here’s an glimpse at what Adam’s bedroom looked like before. Isn’t it amazing how much the space changed?
15 commentsNew sweater & clean teeth.

Fritz has a new sweater! (Ignore the awful photo, just concentrate on his soulful gargoyle eyes.)


Bruno got his teeth cleaned and now has minty-fresh breath. Poor thing has a chicken bone for a leg, as evidenced by his post-IV bandage.
20 commentsThank you.
Pssst…I’m still here! I have lots of house projects to post about, I’m just so incredibly busy with work-work right now—I feel like I don’t have any brain space left at the end of the day.
For now, though, I just want to say thank you to everyone who stopped by and left comments on this post (and this one, too). I’ve gotten so teary-eyed reading through the messages of hope, happiness and excitement from people all over the world! It’s difficult to express how much it means to me (and to most Americans, I imagine) to know that we are not alone in moving forward.
Love! x
9 commentsRestored dining room window.
While we’re all waiting, I thought I’d show you one of the projects I’ve been working on for the past few weeks—repairing and restoring the large (55″x78″) 4-pane window in our dining room.
Unless you’ve repaired an old window yourself (particularly one of this size), it’s hard to understand the amount of work that goes into a job like this—scraping, patching, sanding, filling, caulking, glazing, weighting, nailing, gluing, painting…etc. I definitely never knew what was involved before we bought this house! Windows are persnickety things, but the great thing about an old window is that it can be repaired. I take pride in our house’s 125-year-old windows, and the strong, old-growth wood that went into building them. Not a single sash in this house has ever been replaced, and most of the panes are the original wavy glass. It’s beautiful when the light comes through them, bending here and there and making soft ripples in the view. I would never consider replacing them.
Beauty and history aside, these old windows are unbearably drafty if not maintained well. Caulking gaps, filling rotted areas with epoxy, and adding weatherstripping makes more of a difference than you might think. Hopefully the hours I logged working on this window will translate to a few bucks saved on oil this winter!
I also stripped the original cast iron lock (in a future post, I’ll show you how to easily strip old hardware!), which was covered with so much paint that it no longer closed. I love the details even on the simplest things in old houses. And did you know that the purpose of locks on old windows is not to provide security? They’re actually there to hold the sashes together tightly, keeping them from rattling in the wind and stopping air from entering between them. When they’re attached in the right position, they do their job very well.
27 commentsTomorrow is the big day.
This is really the only thing I’m thinking about. I want this so much for my family, my friends, my country, and our world. Please, please. Let this happen.
VOTE OBAMA/BIDEN on NOV. 4th!
(Obama 2008 poster by Lance Wyman)
58 comments


