

I’m feeling pretty pleased with the progress Evan and I were able to make in the garden this weekend. In a total of about 8 hours over the course of two days, we managed to construct two 8-foot mega-planters. That includes the time spent buying the wood and transporting it home! Total cost? About $100 total . . . for both planters. Fifty bucks a pop!
I took a few progress shots along the way just in case someone else wants to make a mega-planter or two. The whole project was super-easy. Seriously. Anyone with a drill and a jigsaw can do this.

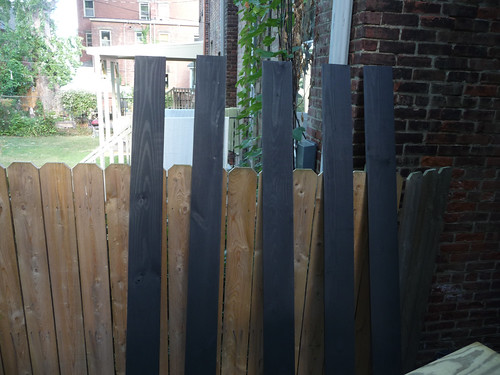
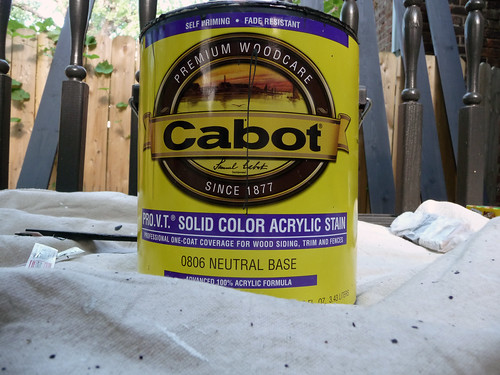
After cutting all of our wood to size (we used 1×6 planks that were already 8 feet long, so we really just had to cut the side pieces down to 18″, and cut up a few 2×2s to create the support posts), we got to painting. I like to use Cabot Solid-Color Acrylic Stain for outdoor projects. It has the look of a flat, solid paint, but won’t chip or peel like paint does. The stain is very forgiving and easy to apply, usually only requires one coat, and dries completely in less than an hour. It really does hide the grain (but not the texture!) completely, though, so you might want to use something translucent if you prefer a more “woody” look. Since we already have so much wood going on outside between the deck, the porch, and the fence, I really wanted something subdued. Black has a nice way of receding in gardens, too.
(By the way, one gallon of this stain goes REALLY far. We bought one can two years ago, and even after using it for a gazillion projects, the level has only dropped about two inches. I fully expect this can of stain to outlive us all.)
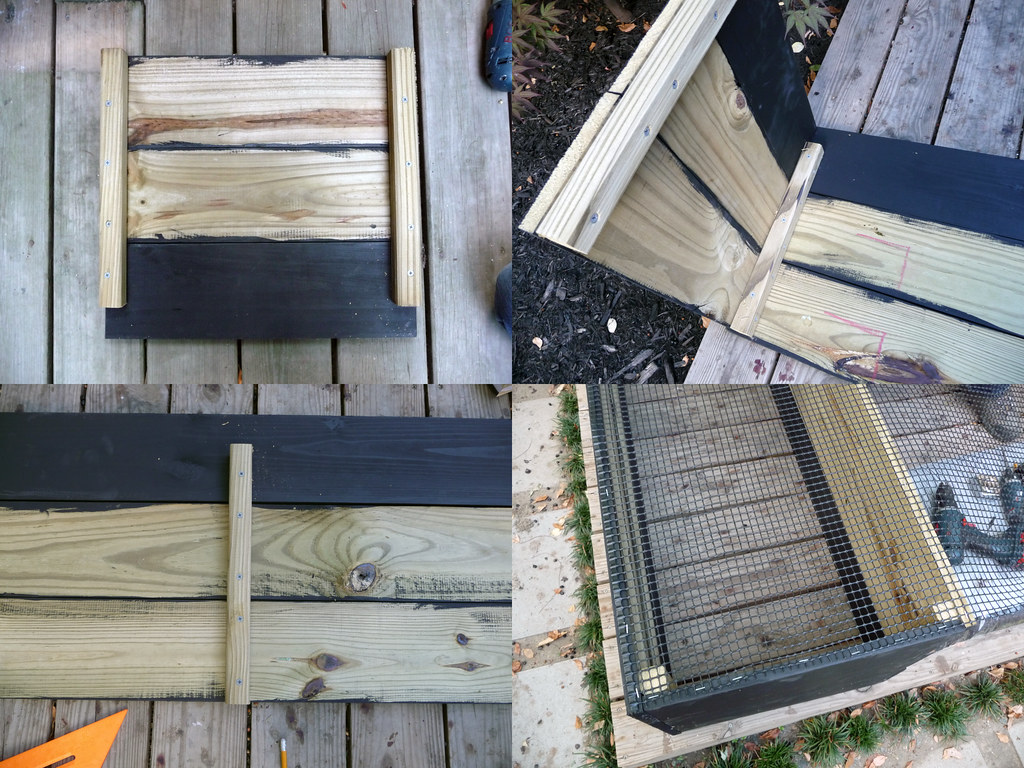
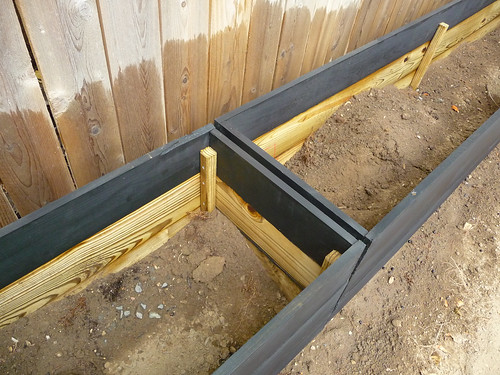
The assembly process was easy. Screw the posts to the end panels (we screwed through the back so the screws won’t be visible on the finished planter), screw the end panels to the front and back planks, screw on the center posts for extra support (this may not be necessary with smaller planters). We used exterior decking screws that won’t rust. For a finishing touch, we stapled mesh screening onto the bottom of the planter. With all the groundhog* action that’s been going on in our garden lately, I consider any small defense a good one.
*At last count, there are four groundhogs: Haggis, Patches, Scarface, and my arch-nemesis, Fatback.
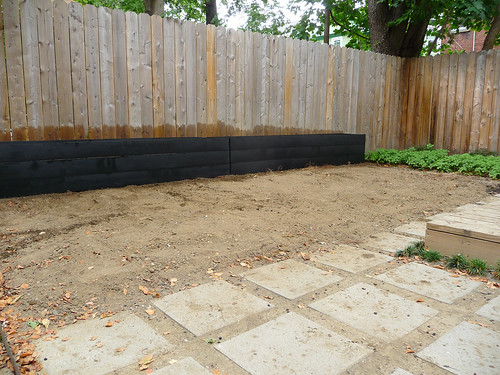
The planters are in place! We spent a good amount of time leveling them and making sure they were sitting nicely together. We’re planning to throw in a couple of bolts to keep them in line with each other over time, too.
THE DIRT PILE IS GONE! It felt so good to shovel all of that excess dirt that’s been migrating all over the yard for the past couple of years into the planter, let me tell you. We’re going to fill the planters the rest of the way with nice, rich planting soil, of course, but it’s okay to put crummy dirt in the bottom. Ahhhh. Bye-bye, dirt pile! I won’t miss you.
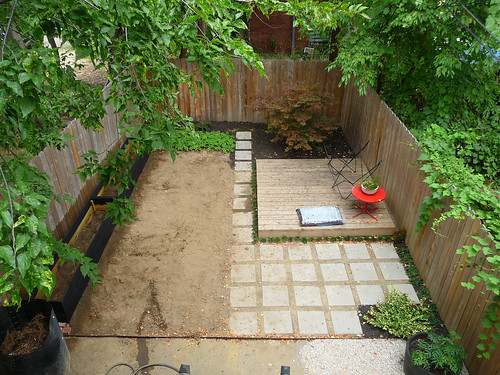
I took a second-floor shot of the whole garden so you can see how much area the mega-planters take up. I’m not sure yet what we’re going to plant in there (possibly something tall and evergreen and bushy, mixed in with some brightly-colored flowering perennials), but it’s so exciting to have another piece of the garden plan DONE.

72 Comments
Gorgeous!
I love the dark stain!
I love the whole landscape of your yard, very tranquil
Oh JOY, sistah! They look gorgeous… really and truly. Whatever you fill them with will look splendid, I’m so sure! Progress is sooooo satisfying, no? Yes.
It’s really coming together. I love the dark stain. And such an inexpensive project!
wow, you’re yard is fantastic!! *jealous* And in NYC too?! Fabulous job with the planters- it’s going to look great with some pretty flowers and greenery back there =D
@Alice: This is actually in Newburgh, New York — about 60 miles north of NYC. 🙂
the backyard is coming together! And the planters look so good in black!
I love how simple and BIG they are!
I think it looks amazing! I can’t wait to see how it looks when your plants are in and growing.
I don’t know but when I see projects like this I think that there is no way on this planet that I would be able to do something like that. They came out awesome, as did the deck-I just doubt that I would have the skill to do something like this. Can’t wait to try though. It must be really rewarding to look back at this and know you accomplished this.
I love the look of the planters. Some chartreuse foliage might look against the black stained wood.
Now that’s a planter! There are plans for our backyard to have raised flower beds, and I will just have to save this post for inspiration when that project comes around. Thanks for sharing!
They look beautiful Anna and really fit in well with the other things you are doing with the space! I love the stain, and might use it in dark brown for my picnic table later this week. Ladies and gentlemen, I have witnessed Fatback squeeze through an impossibly small looking opening under the fence, and it was both miraculous and horrifying!
Wow, these look great! Some long grasses would suit your yard too! Can’t wait to see more progress!
beautiful. i might build a couple of these for our alleyway guerilla garden next year. thanks!
@Adam: I don’t think you want to use this kind of stain for a surface you’d be eating off of. It’s totally matte, and I don’t think food would clean off of it easily. I imagine there would be health concerns, too, since it’s not rated for that kind of use. If you’re just painting the legs, though, I think that would be alright.
Also, maybe consider something like dark blue if you want to go solid and dark…OR a dark brown stain with some translucence to it (maybe oil-based). Flat, matte, opaque dark brown has a tendency to look really depressing and icky.
wow – such a small simple project but really high impact. your garden is really coming along nicely and when it’s finished i imagine it will be quite amazing.
It looks really good!
i’d suggest sky pencil holly trees for your planters. they’d be perfect and (i think) fit your aesthetic to a T. excellent work!
Every time I see an update post about a project you and your husband are doing or have completed around your house, I begin to weigh the importance of having a life partner who is willing to spend countless of hours, choosing, making decisions, heavy lifting, building, painting, etc. to make our home look beautiful.
I commend you both for at least looking like you haven’t bitten each others’ heads off through this entire process of re-working your home.
The planters look GREAT! Love the color, love the scale.
I love that you’ve named the groundhogs. A groundhog named Haggis makes me inconceivably happy.
Damn! Looks amazing!
I love that stain, would be perfect for a few ideas I’ve been tossing around. We just got rid of the dirt pile and weeds in our side yard and it feels so awesome. Something small like that getting ticked off the list is so rewarding!
Looks fantastic.
LOVE the platers. DIY projects like this really excite me. I’m planning on doing a similar project (and blogging all the way thru it) in the fall to kick start my garden idea for the spring. It’s just waaaay too hot in FL right now! Good luck with the rest of the yard! It’s coming along great!
The whole thing looks so fantastic! I can’t wait to see it all finished. Good job!
I LOVE it! I love your garden plan it is exactly what I would do in my garden. I love the black matte stain, it is perfect.
that looks so awesome! i want to build a planter/little garden in my backyard, but i know mumble would binky over and ravish and devour whatever i plant.
I love your progress shots – the black planter boxes look very smart. Great choice. It will look even better when you have planted your shrubs.
Thanks for the stain advice Anna!
So, what are you gonna do with your giant new ampersand?
i love the idea of matte black planters! looks great!
Beautiful!! I wish I had space to a) build things and b) grow things!
The whole groundhog thing cracks me up. I grew up in the country, in Indiana no less, and I didn’t see a groundhog until I was in my 30’s! And you have 4 in your backyard in the city. This may be a really weird question, but do your puppy dogs go out by themselves to relieve their little bladders? Or do you accompany them so the groundhogs don’t get them?
BTW, the yard is looking awesome!! 🙂
Love the planters! I think the scale of them is fantastic, they have made a great impact to the garden. Looking good Anna.
These are the best looking planters! I see you have given the woodchucks names … just don’t ask us to come down there to feed them for you.
Have you considered some bamboo for your planters?
looks really great! well done.
I love this! Even more than the planters, I love the names of the groundhogs – Haggis and Fatback made me chortle with glee!
We built a vegetable garden similar to these planters this spring, but our version was a little more, ahem, industrial (exposed fasteners, etc).
Anna, your yard’s looking great! Nice work, you two!
Wow. I would never think to stain planter boxes, but those look great! Thanks for a fabulous idea. Your garden is coming along beautifully.
Love! And thank you for sharing how to build them. By husband and I were just watching Yard Crashers and they had some huge planters and I said I wanted some. Now, I can make them 🙂 And I love the black color! In fact, in my backyard I want to paint the fence black but I’m still working on convincing my husband on that one. Fantastic job!
Wowzers! The planters look fantastic. You have made such great progress in your garden. I just recently visited a garden that used a lot of black and it made everything really pop. Looking forward to see what you will plant.
PS How is the vestibule doing?
love the step by step… (your instructions, not the TV show). and i love your results! i love your design sensibility and your perfectionism. lovelovelove
@brandy: I love the look of sky pencil hollies, but apparently the small ones (which are all we can afford!) are very slow-growers. I may have to look into some kind of yew or euonymus instead!
@Patricia Ann: We’re pretty civil, it’s true!! 🙂
@mari: I never knew that “binky” is a verb, but I plan to use it regularly from now on!!
@Sarah: I think it’s going in the apartment! We really need something bold and graphic in that small space, and it fits the bill perfectly. 🙂
@Lori: Believe it or not, our dogs have never been in the backyard! Isn’t that sad? It just hasn’t been anything close to “puppy safe” until now — and we still have to work on closing up holes and blocking off dangerous areas. Our guys are so little!
@mommy: Don’t worry, we won’t!! They seem to be eating plenty already. 😀
@Adam: I love bamboo, but I think it’s probably not a great idea unless you have planters that are thick concrete or steel with totally solid bottoms — bamboo is horribly invasive, and if the roots are allowed to go into the ground, it can quickly take over an entire neighborhood of gardens. We did have a potted bamboo plant last summer, but it died…
I started thinking about how invasive bamboo is right after I posted my comment, and you are right, if even a little got out it would spread all over! Maybe some tall decorative grasses towards the back of the planters close to the fence?
That’s exactly what we’ve been thinking, Adam! 🙂
Amazing!
Cheers!..to a job well done.
Love these planters. Your garden mock-up needs to say “almost there.”
I won’t give my two cents on bamboo, especially since I might soon be sharing the inside of my house with it.
I was wondering what you thought of using the Cabot stain on fencing?
Love this! Looking forward to seeing life spring forth from those bad boys 🙂
Ok, you have probably already thought of this and maybe it has been discussed already so forgive me if I am going over something again… As somewhat of a “greenie” (not to be confused with a “green thumb” as most house plants and annuals are lucky to live at my house let alone thrive) have you considered what plants are native to your area? Native plants require less water and less attention. And I know here in Indiana, people are always needing to split off their plants so a lot of them can be had for free. I would bet 75% of my landscaping is from others yards. With their permission of course… 🙂 Just a thought!
So my pregnancy brain is not working. I was attempting to imply I was a “greenie” but after re-reading it, I didn’t think it came across that way… Oh geez. I need a nap.
Your back yard is starting to look really great Anna. Am loving these new planters, especially the colour and the way you can still see the texture of the timber in the light.
ooh, running bamboo is dangerous! anna you are so right to be cautious; you have to backhoe it out sometimes. what a nightmare.
as for what kind of plants to use in your handsome new containers … i would be careful to consider the available depth you’ve provided when deciding how tall of a plant to get. i think a good rule of thumb is to provide a soil depth below ground level which is roughly equal to the future mature height of the plant (above ground level). otherwise the plant will likely be cramped forever and/or bust out of the planter mesh.
i thought the idea for native plants was great, especially considering summer heat and how often one has to water non-native plants to keep them from crisping up.
anyways love watching your projects come to fruition and your photos too. your taste is inspiring.
stumbled upon your blog! and love it…
your back yard is looking amazing and quite zen.
The planters look great! Can’t wait to see the final product 🙂
your whole house (and NY apt) look so amazing. it’s thrilling to see what you’re doing with your yard now. I just love the way it’s starting to come together.
I would suggest some Nandina Domestica (heavenly bamboo) for your planters. They aren’t a true bamboo, but do have a delicate leaf that resembles bamboo. They are evergreen, get red berries in the winter, white flowers in the spring, thin enough for those boxes and may grow up to 6 ft tall, though maybe not with the depth of the boxes. Moderate grower.
And when you fill your boxes, don’t use straight top soil – do a mixture with some peat moss, horticultural vermiculite, and compost. Your plants will love it! Good luck.
The planters look AWESOME! I love how they fit the style of the interior of your equally awesome home. Can’t wait to see what you put into them!
Anna, what kind of 1×6 boards did you use? My wife and I are thinking of a fence with a similar opaque stain. Is it pressure treated lumber, just pine boards, etc.?
Brilliant…I definitely have a use for the ‘how to’ pics!. I was going to make some planters for around, what will be, our new patio so thanks very much for that.
I painted all our dodgy garden furniture in black stain at the beginning of summer and it’s given it a new lease of life and looks fab with the pink pillows we bought, not that I’m normally a great big fan of pink but since having work done on the house we have had a wall built specially just so I can render it and paint it deep pink! Can’t wait. Garden is looking great by the way and love what you do.
ok, we’ve been meaning to build something along these lines, and this post is seriously inspirational. they’re gorgeous!
When you levelled out the garden, did you leave it all dead level or did you need to slope it gently a certain way for drainage when it rains? and if so, where did you slope it toward?
i’m about to undergo the flattening of my back yard and would love that tip from you!
Hi Anna!
From time to time I visit your blog and wish to congratulate you for the gorgeous shape your garden is taking. Great work you have done with the two planters.
Your DIY skills and flawless style never cease to amaze me! These look fab!
http://bodieandfou.blogspot.com/2010/08/my-meeting-with-jacqueline-morabito.html
Those look really good! And your backyard is a lovely little spot. It will look great when finished!
These are beautiful and it was smart to attach the mesh on the bottom. Thanks for sharing the d-i-y details. Your garden is really coming along.
hi anna — love your blog and love this project! i do have a slight concern though — dirt/roots/water really tend to expand and contract and i fear that the 8 foot length will cause the boards to bow out in a year or two (i learned this the hard way). before you fill them it might be a good idea to somehow tie the front and back boards to each other say every 2 feet — either run a board from front center post to back center post (it can be invisible underground). or even just screw metal strapping from front to back. i think that will help take the pressure off the boards.
Nice project Anna. It will make your backyard to look much better when the flowers grow up. But you should probably have used better soil for the planters.
@Jay B.: Check the post: “We’re going to fill the planters the rest of the way with nice, rich planting soil, of course…”
There’s only about an inch and a half of bad dirt in there.
wow, I’m seriously making this!!!!
Those planters look AMAZING! Great job! And I love the way you’ve space planned your small backyard! I think smaller is better! You get to use every bit of space creatively!
good work, all the steps are well defined here ..
I love the idea to mix the colours. And I would paint the deck to the black matte stain as well. Small tiles made the patio look bigger. Awesome.