
YEAH. Painted. A couple of weeks ago, I posted part one of my plywood plank kitchen floor installation, and since then I’ve been trying to get the second part together. The second part is the fun stuff, because it’s really just paint.
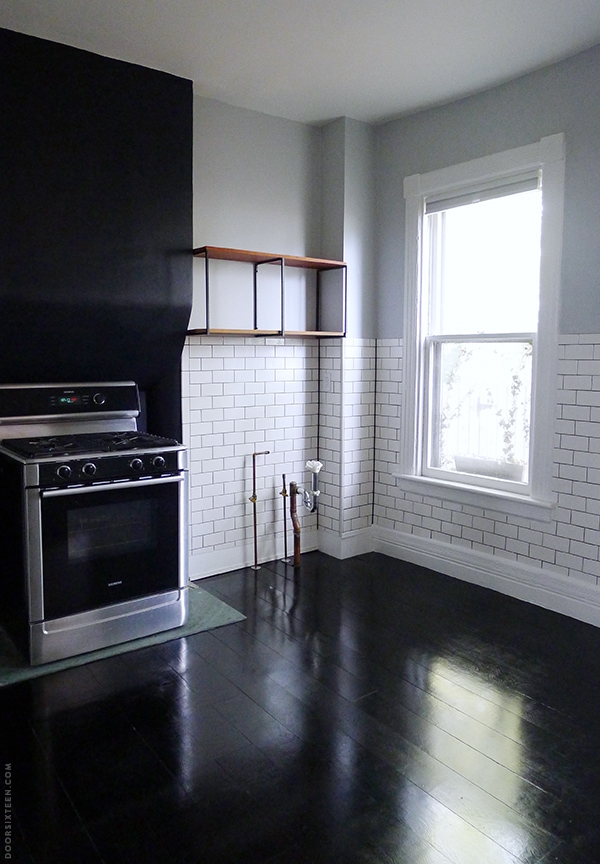
As you can see, I decided to just go with black. I know, I know…the old VCT floor was black, and I had all of these grand ideas about painting crazy patterns on the floor, but in the end simplicity won out — as it often does (and often should). That’s not to say that at some point in the future I won’t come back and decide to paint a pattern on top of the black, but not now. It’s 27° out. We need heat. We need to not be washing dishes in the bathtub.
After reading this post and having a conversation with the knowledgeable guy at the paint store, I came to a few conclusions about how to proceed with painting the finish-grade maple plywood:
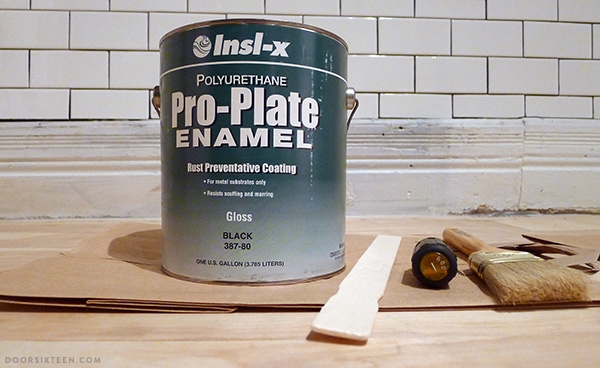
1. Use a good-quality, oil-based paint. Paint Store Guy recommended I use Insl-x Pro-Plate Enamel, a super-durable paint made for use on metal but also rated for use on wood and masonry. It comes in 8 colors, all of which you can imagine being used to paint a utility room in the basement of a hospital, but fortunately one of the those colors is black — yes, just straight up “black,” not tinted to match a Benjamin Moore swatch or anything like that — so that’s good enough for me.
2. Don’t use primer. Obviously this approach could be an issue with lighter floors because of the potential for tannins from the wood to bleed through, but with a black floor, Paint Store Guy was in agreement that skipping primer would allow the paint to seep into the porous, never-finished wood, making for a finish less likely to chip or peel.
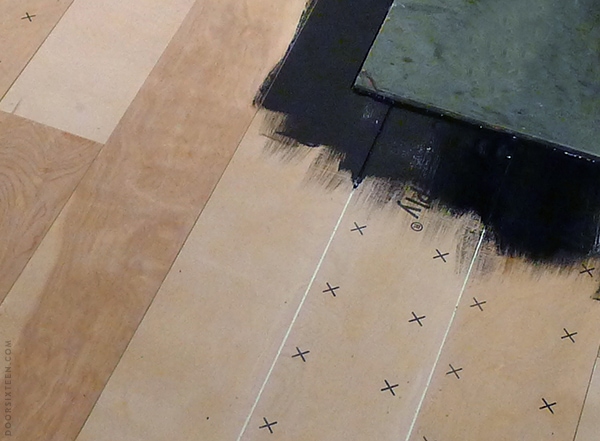
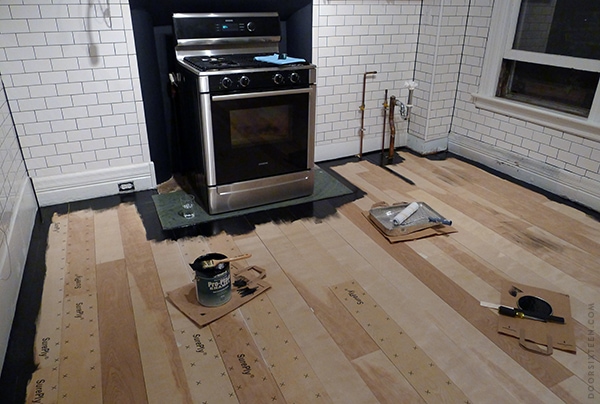
3. APPLY THIN COATS and let your paint dry completely. This is crucial. Thick coats of paint are more likely to peel. I did the first coat with a roller, which went on beautifully and evenly without a glob in sight. I used a large brush for the second coat because I don’t like the way rolled finishes look on wood surfaces, and I was very careful to go slowly and use a light hand. I was prepared to do three coats, but two was enough in this case. I let the paint dry for a full week between coats, and then allowed an additional full week of curing time before I even considered walking on the floor. Yes, that’s a long time to have a room out of commission, I know.
4. Sand between coats. Nobody wants to do this, including me. “Sand between coats” resonates with me the same way the advisory on a box of Q-Tips to not insert in the ear does, which is to say it goes in one (swabbed) ear and out the other. This time I did it, though, and I’m glad I did. The photos I took between coats are too crappy to be worth sharing, but the first coat dried to a very matte finish because of the wood’s porosity, and the finish was anything but smooth. I spent 30 minutes with my trusty Bosch random-orbit sander, a face mask and a whole lot of plastic taped over everything (doorways, shelving, stove…), and then it was done. I then followed with a thorough vacuuming and mopping of the floor before diving into the second coat of paint.
✚ Side note: My method for painting the white floor in room above the kitchen was considerably different, and that’s still what I recommend doing if you’re not looking for a super high-gloss black finish in a high-traffic room like a kitchen. That white floor has held up like a champ and it still looks great nearly five years (!) later, but it’s a very different look and a very different substrate. As with most things in life, there is more than one solution for a task depending on the circumstances!
A few other notes about the process…
Prior to both the first and second coat, I spent some time filling in the larger gaps between the floorboards with caulk. I thought I’d hit all of the crucial areas on the first pass, but once the black paint was down I noticed more gaps that really should have been filled. The caulk sinks down a bit into the gap, so the boards still look like boards — no big thing. I also caulked around the entire perimeter of the room, of course. I’ll take any opportunity I can to make the house less drafty!
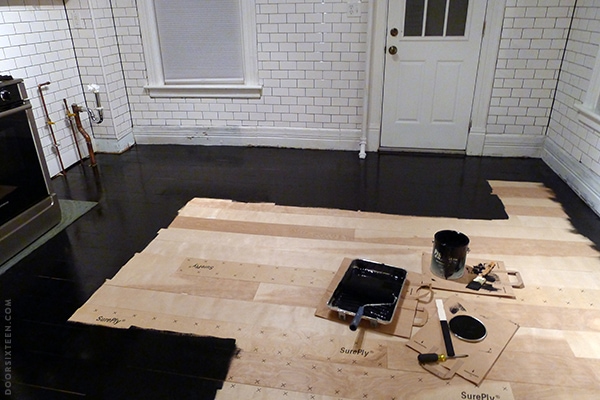
For the first coat I did all of the cutting in with a brush, then switched to the roller to fill in. As I mentioned, the entire second coat was done with a brush — much, much more time-consuming, but a brushed finish on wood is just so much nicer.
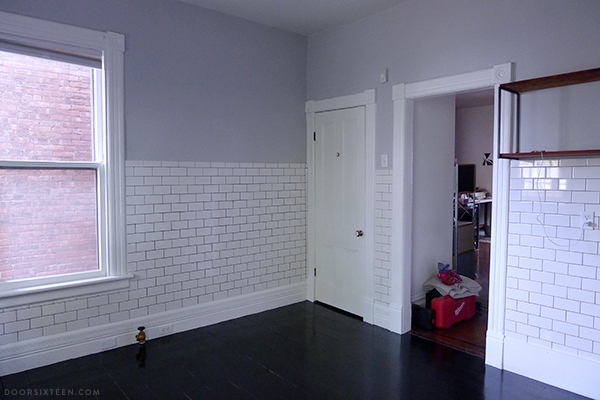
Ta-da! I love how reflective the floor is. You can see it better in the top photo, but the grain is still slightly visible, too — just enough for the floor to still look like it’s made out of wood, which is what I wanted. Once the black paint was completely dry, I gave the baseboard moldings a fresh coat of white (Benjamin Moore’s Simply White in a satin finish, same as the rest of the woodwork in my house) and did my best to keep the edge as crisp and neat as possible. The moldings in the kitchen are pretty beat up so it’s definitely not perfect, but it’s good enough.
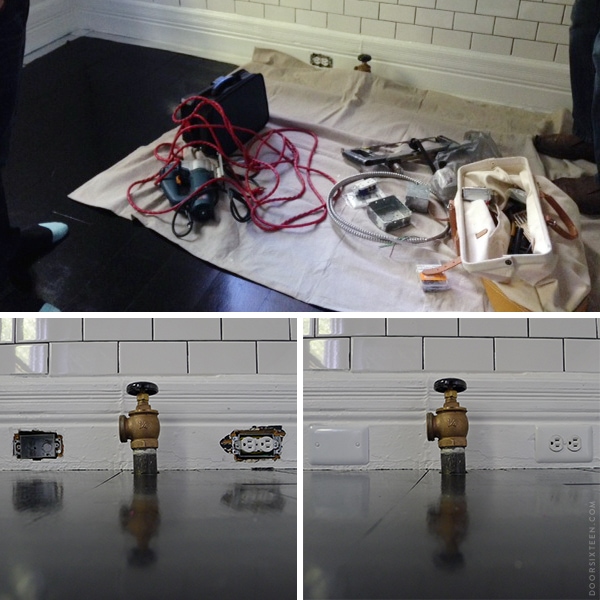
This isn’t directly related to the floor, but it was absolutely essential to get it done — with the help of our Electrical Fairy, we moved the refrigerator outlet. Several weeks ago we had the supply line for the radiator moved about a foot and a half to the right so the radiator could be centered under the window, which meant the outlet would have been totally inaccessible. The old hole won’t be visible, so we just covered it with a blank metal plate rather than bothering with a proper patch job. Again, good enough!
I’m a couple of weeks behind on kitchen updates, and a LOT more has happened in there since these photos were taken. I wanted to give the floor its own post, but I promise more updates are coming very soon!
58 Comments
Incredibly impressive as always! But between you and Daniel, I feel like a slug 🙂
I feel like a slug next to Daniel, you’re not alone!
Good Job Anna! I like the combination grey/tiles/black floor. So neutral and clean! You’re my idol! hahaha. How can you work until late in the office, take care of your house and update your blog? 🙂 Tell us the secret. I wish I could do 20% of you do. Congrats!
OK, here’s the secret: DON’T SLEEP! Also drink lots of coffee. You’ll feel terrible all the time and you’ll be an emotional wreck, but hey…sacrifices!
Stunning!! Job well done. I thought your kitchen was beautiful before but this is amazing. I can’t wait to see it all put together!
This makes me feel stupid, but I didn’t realize there were blank plates to cover old electrical holes. There is one in my son’s bedroom that’s been bugging me for seventeen years! That is now on my shopping list for the next time I hit the hardware store.
And your floors?
Gorgeous! Luxe! Shiny!
P.S. I was just thinking of you the other night, because my father just published a book of short stories and I love the book design. He’s published novels with a local small press before, and the book design always screamed “amateur!” Great book design makes all the difference.
Here’s a photo of the books:
http://instagram.com/p/go_6p8LQ89/
Katy, that’s a really nice cover! Do you know who the designer is? Love it.
They look gorgeous! Making your own plywood planks was so resourceful. Love the way this turned out & it fits the character of your kitchen/house so well. What is the stone slab under your stove? Soapstone?
Thanks! I’m pretty the slab is slate. It’s the original hearth stone, and even though I don’t love the color it’s one of my favorite things about the kitchen. 🙂
Gorgeous! One thing I love about you, you espouse the “do it right the first time” mentality, and it always comes out looking amazing! I don’t know that I’ll ever paint my floor black (first I’d have to own a house…), but if I do I know I can trust your recommendations. ^_^
It looks SOOOOO GOOOD, OMG. I can’t wait to come over and see it in person!
(aren’t you so glad we cut those boards in half?? The scale of the boards is just right. love.)
YES. Thank you forever.
Incredible. So smart – both in terms of brains and chicness. Really wonderful job. Congratulations on getting it done in time for heating season.
Stunning! I love it. I thought primer made paint last longer, so go figure. I guess floors don’t work that way.
It really depends on what you’re painting — it’s not that primer isn’t good for floors, it’s more than in this case (because the wood was so porous and I was using such a deep color) I wanted the first coat of paint to function more like a stain and really soak into the wood. I’m definitely not trying to make a case against primer! I used it on the upstairs floor (that’s the other floor post I linked to), but that was a different situation…
That floor is DREAMY! Wow.
(You’re sure you don’t want to come redo my apartment???!!!)
If only weeks had 10 days, Kelly, I’d be there tomorrow!!
Anna, one of the things I love about how you renovate is that you always take the time to do everything right and never cut corners. Caulking all the way around the kitchen? Waiting a week for paint to dry? These are things a lot of people don’t want to take time for, but it makes such a difference in the long run. Love those glossy floors!! Can’t wait to see it all put together.
Oh, I cut PLENTY of corners, believe me! I mean this whole floor is corner-cutting. 😉 There are certain things you only get one shot at, though, and I’d be sad if I spent all that time cutting down the boards and nailing them into place only to have the paint come out crappy. You know?
Wow looks absolutely stunning I love the simplicity of the black. Really love those shelves too, can’t wait to see the room once it’s got everything back in place.
Gorgeous!! Well done, Anna. I loved what you said about sanding between coats. But good for you for doing it!
jbhat
Fantastic!
Wow! The results are amazing! I love it!
Looks beautiful! Love how crisp and striking the white is next to the black and gray.
Those floors gave me goosebumps. What patience and vision you have!
i love it! is it hard to keep free of puppy paw prints?
It’s only been a couple of weeks and we’re not really fully moved back into the room yet so I can’t say for sure, but I doubt it’ll be much different from the VCT. I don’t really care so much about keeping it all perfectly shiny — as long as I vacuum and mop once a week, that’s good and clean enough for me. 🙂
That black floor is GORGEOUS!!! I love, love, love what you have done so far-can’t wait to see more photos 🙂
I just wanted to say…I get so nerdy excited when I see a new post you’ve put up. I quietly follow your blog and just love everything you do! Your home makes me dream. thanks for the new post today…woohoo! 🙂
Thanks so much, Jeanette!! 🙂 🙂
Everything looks so shiny and new! Congrats on finishing!!
love, love, love, love, love.
hooray for you. it’s done.
all the best, jo.
It looks so great!
Oooh, I’ve been waiting for this. It looks incredible!! I love the shine!
simply lovely
Bravo
Wow! You are amazingly talented and have such great taste. I can’t believe you tiled the kitchen and replaced the floor. I love following your blog. Please, don’t run out of projects!
Hah, I don’t think that’s possible!
Very clever idea. And I think this is something that would work well in my house and wouldn’t bankrupt me in the process. I wonder though, do you think the plywood would take a stain all right? Or would it just look cheap and wrong?
You can definitely stain plywood if you buy a type that’s indicated as being “stain grade,” but that’s not a look that I’d personally be into for a floor.
freakin’ gorgeous. i’m blown away as always.
It looks fantastic!!! How do you clean this kind of finish? You mentioned mopping above, so is it safe to get it wet? Do you need a special cleaning product like a wood polish? And how do you keep the white floorboards upstairs clean? I’d love to do something like this, but I’m afraid of ruining the finish.
I’ve never done anything special with the white floor upstairs (vacuum weekly, mop a couple of times a year…if that), and I don’t plan to in the kitchen, either. I just use one of those Swiffer Wet cloth things because they’re easy and I’m lazy. It’s just paint like the paint anywhere else in your house, no special finish! 🙂
dang Anna! way to go! looks fantastic!
HOLY FLIPPIN BALONY!!! THOSE ARE SOME NICE FLOORS. I WANT. I never knew you could “paint” over the wood and get that look. I always thought you had to buy that specific type and color. Thanks!!
the floors look beautiful! love the gloss black.
Long time lurker, first time commenter – that floor looks so gorgeous and amazing! I am floored (lol.) Seriously, this is outstanding, especially considering you only paid $140 for the wood planking, + paint. Awesome job!
I just cursed…your floor is THAT good. I also might hate you just a smidge. But only in the “that Anna is one bad ass b!” kind of way. Bravo girl, bravo.
love the floors. by the way, you have the exact same stove as we do. you are only the third person (myself included) with the same model. love it.
Any reason you did not paint the boards and then install them? I am considering doing this but cannot have the down time with the floor off limits.
I suppose could have done it that way, but it would have been so much more difficult. With a week of drying time, I can’t imagine where I would have put all of those boards while they dried — not to mention how much longer it would have taken to do the actual painting one board at a time on a sawhorse (or whatever). Also, I still would’ve had to do at least one more final coat after the boards were nailed down, since the caulking obviously can’t happen in advance and doing all of the cuts would have damaged the finish. Seems like a nightmare all around, honestly!!
LOVE the floors!
You inspired me to paint my kitchen hardwood floors black too. 🙂
Hi Anna!!!
How is the plywood floor and paint holding up now that it is about 1.5 years old? Is your kitchen heavily used? Any comments on what you would do differently with respect to durability? How long do you expect it to last?
Thank you!!!
Penn
Hi Penn, the floor still looks great. I can’t imagine why it wouldn’t hold up for at least a couple of decades, if not longer.
Hi! I’m really really interested to hear how the caulk lines are holding up??
I sold the house two years ago, but at the time I moved, they still looked the same. No issues.
I love the look of these floors! I’m wondering if the dark color attracted sunlight and created extra, unwanted heat in your home during the summer months?
Hi Sara, that was a non-issue. The back of the house was well-shaded, the house had great cross-ventilation, and with those high ceilings, the first floor never really got hot. (Cold is another story, haha.)
Hi Anna. I loooove your floors! I have black floors too…black refinished bamboo. I am having a hard time coping with the barefoot footprints my family leaves; however, I looove the black. Do you think if I did a clear topcoat that it would resist footprint marks?